18 June 2012

A Burnt Ring Finger & Brown Sugar to the Eye

I must have a case of the Mondays. It's the only thing I can think of that would result in upping my all time injuries in the kitchen tally from two to four in one day. First, I accidentally tipped a pot of freshly cooked rice vermicelli into the sink. What was my next thought process? Oh, let's scoop them all up with my bare hands! Folks. Don't do that. It's a TERRIBLE idea. Then just now, I somehow flung brown sugar all up on my shirt, my hair, and in my eyes! Crazy, I know.

However, at least these mishaps led to hearty eats! I now have lunch (or dinner) set through Friday-- Asian noodle stir-fry filled with soft tofu, sugar snap peas, and zucchini. Continuing with the zucchini trend, I went and tried out a new zucchini bread recipe and a "secretly healthy chocolate cake" recipe.

I made very few modifications to the recipes, but so that you can keep track at home here are my baking notes!

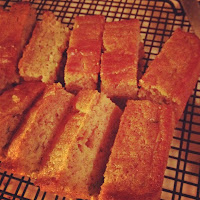
Zucchini bread (16 servings, 4 WW+ points each)
  • Used the oil option rather than butter
  • Used whole wheat flour instead of AP
  • Used fat free greek yogurt in place of plain yogurt or sour cream
  • Did not add craisins
  • Did not top with glaze
  • Will grease and flour the pan next time; a liberal coating with a non-stick spray does not get the job done with this bread!
  • Yields a dense, shorter slice of bread
A great little snack that I intend on pairing
with a fresh smoothie for breakfast this week!
Dark Chocolate Zucchini Bars (9 servings, 3 WW+ points each)
  • Used all whole wheat flour instead of AP
  • Used fat free greek yogurt in place of apple sauce
  • Substituted a "chia" egg (1 tbs chia seeds + 3 tbs water) for the egg
  • Added 1/8 tsp of cayenne pepper
  • Did without the optional chocolate chips
  • Removed from the oven when the toothpick was not quite clean, so that the bars were more fudgey and brownie-like
Topped with fresh strawberry and ice cream!
And the best part of all? Not only do these treats sneak in an extra bit of vegetable to your daily diet, but you can bake these simultaneously since they both call for a preheated oven at 350 degrees Fahrenheit! Now what's stopping you? Try these recipes out!

12 June 2012

Peanut Butter and Chocolate Kissed Banana Muffins

It's been muggy and in the 70s, if not 80s, here in Happy Valley for several weeks and today I did the unthinkable. I decided to bake. The window air conditioner unit I bought is not even installed and it still seemed like a good idea to use the oven.

Luckily for me, and all of you, this recipe is worth turning on the oven and sweating for- The muffins are healthy and oh so flavorful!

As many of you may know about me, I am obsessed with peanut butter. I love it so much that the first time I went on Weight Watchers I was disgusted by how many points (the measuring system in WW) are in two measly tablespoons! I quickly found PB2, a healthy, natural alternative to peanut butter, that easily allows me twice the amount of peanut goodness for less than half the points of the real stuff. Since then, I've been meaning to try PB2 out in a baked good and now we have its debut! And my few, faithful followers, don't think that this means you have to use PB2 to make these bad boys. You can just as easily sub in the same amount of peanut butter into this recipe (though you'll want to heat it up, so it's warm, more liquidy, and easy to mix)!


Peanut Butter and Chocolate Kissed Banana Muffins
Recipe inspired by Skinny Taste's Low Fat Peanut Butter Banana Muffins

Yields 12 muffins


Ingredients
  • 2 tbsp butter, softened
  • 1/3 cup light brown sugar
  • 4 ripe medium bananas
  • 2 large egg whites
  • 1 tsp vanilla extract
  • 6 tbsp of prepared PB2 (6 tbsp PB2 mixed with 3 tbsp water) OR 6 tbsp of your favorite peanut butter
  • 1 cup whole wheat flour
  • 1 tsp baking soda
  • 1/4 tsp salt
  • 1/4 tsp cinnamon
  • 1/4 cup semisweet chocolate chips 
Directions
  1. Preheat oven to 325 degrees Fahrenheit. Line muffin pan with 12 liners, or spray pan liberally with your favorite non-stick spray. 
  2. Cream together butter and sugar. While these are creaming, peel and mash the bananas in a small side bowl. A few small lumps of banana are fine, but avoid having extraneous banana chunks on the larger side.
  3. Once butter and sugar are creamed, scrape down the sides of the bowl, then mix in bananas, egg whites, vanilla extract, and peanut butter of your choice. 
  4. When the wet ingredients are well incorporated, fold in all of the dry ingredients except for the chocolate chips. Be sure not to overmix or you'll end up with tough muffins!
  5. Pour batter into the muffin tin, filling each designated muffin area 1/3 of the way up. At this point, evenly scatter the 1/4 c of chocolate chips throughout the 12 muffins. Pour remaining batter into the pan until there's none left (or until there's just enough batter left for you to scoop out with your fingers for a taste test before you do the dishes). 
  6. Bake muffins for 25-27 minutes, or until a toothpick comes out practically clean. When storing, make sure they've cooled down entirely, even if this means you have to leave them out overnight. If you don't, you're at risk for these muffins going from perfectly cooked with a touch of undone, warm insides, to the awkwardly sticky, and dare I say it, moist, texture. Alternatively, just eat them all at once! 
Whoa, blurry, sorry about this everyone!

These muffins come in at 4 points and are great for a snack, a treat, or even to start off your day, perhaps with a bowl of fruit salad and a small side of scrambled eggs. Don't be afraid to go crazy with the filling options, either. I suspect adding in a dollop of jelly would make these muffins a great play on PB&J. You could also try using peanut butter chips instead of chocolate chips, a little ball of coconut flakes, or even mini-marshmallows! Actually, why not try a combination of all of the above?

Happy eating, folks!

11 June 2012

Slutty Cupcakes

Eek! It's been 2 days shy of a month since I last posted. Thankfully, what I have for you today consists of 3 layers of decadence. Following the slutty brownie trend that swarmed the Internet earlier this year I was inspired to transform these beauties into cupcakes. Unfortunately, I don't have any good quality pictures to show of them, so you'll have to trust me on this one!

The traditional slutty brownie begins with a layer of gooey chocolate chip cookie, followed by Oreos that have been topped with your favorite brownie recipe. In the cupcake, I decided to switch it up a bit. I used a brownie base and inserted a chilled ball of eggless chocolate chip cookie dough, so that while the brownie-cake baked, the dough warmed up and became perfectly gooey and not quite all the way done. Lastly, I went with a buttercream frosting with crushed Oreos mixed in, and then topped it all off with a whole Oreo! Whew! And along the way, I learned that brownie-based cupcakes aren't meant to be cooked using muffin/cupcake liners unless being served while still hot and easy to peel from the liner. So spray up your muffin tin and give it a good dusting with flour!

I foresee many permutations of the Slutty Brownie to comes, so check back for variations based on the infamous peanut butter & chocolate combination, as well as mint and chocolate duo.

For the brownie base, I used this recipe. I found mine took longer to cook (because there was a chilled ball of dough in the center, but of course) than recommended, so you'll want to stay close to the oven and take them out frequently to test them with a toothpick. I would say take them out when the toothpick still comes out a little gooey. Just like with regular brownies, you don't want the toothpick perfectly cool or for the brownies to look all the way cooked when they come out of the oven, otherwise once they'll cool, you'll find they've been overcooked and dry! Also important for the brownie base and the chocolate chip cookie dough is to not entirely sub out the AP flour with whole wheat flour without playing around with the wet ingredient ratio, too. Even if it's white whole wheat flour or whole wheat pastry flour, you'll find the texture is off if you do a full swap!

For the hidden chocolate chip cookie dough ball, I used another of Jen's recipes! Since this recipe's proportions is meant for a batch of mini-cupcakes, I ended up with too much batter (and that was with eating a lot of it). Easy solution, keep them in the freezer until your next batch of slutty cupcakes. Or, if you feel a craving coming on, move them from the freezer to the fridge and just pop them in.. not that I'm speaking from experience, or anything.

Lastly, the frosting! I used this recipe from the famous Magnolia Bakery in NYC, scaled to 3/4 instead of a full batch. However, because the cupcakes are so sweet to begin with (and I have a sweet tooth not to be reckoned with) AND you are going to be adding in crushed Oreos, I would recommend starting out on the low end of the sugar scale. As for how many Oreos you want, start with 6-8 Oreos and go with what your tastebuds' instinct!

Alright, drooling yet? Get to the kitchen! I promise to be back to you later this week with some peanut butter banana muffins and then later this month with PB & Choco Slutty Brownies!